Splunk-Appender for TIBCO BW6 logback

Splunk appender can be added to BW6 logback.xml by following the steps below.

  1. Add following jars to D:\tibco\bw\6.4\system\shared\com.tibco.tpcl.logback_1.1.0.001

    logback-core-1.1.3.jar

    logback-classic-1.1.3.jar

    slf4j-api-1.7.7.jar

    splunk-library-javalogging-1.7.1.jar

  2. Modify c:\tibco_642\bw\6.4\system\shared\com.tibco.tpcl.logback_1.1.0.001\META-INF\MANIFEST.MF by logback-core-1.1.3.jar,logback-classic-1.1.3.jar,slf4j-api-1.7.7.jar,splunk-library-javalogging-1.7.1.jar to “Bundle-ClassPath”

  • Modify logback.xml under D:\tibco\bw\6.4\config
    • Add appender for splunk, we must change the RemoteHost and Port based on the ENV

    <!– *=============================================================* –>

    <!– * APPENDER: Splunk * –>

    <!– *=============================================================* –>

        <appender name=”Splunk” class=”com.splunk.logging.TcpAppender”>

            <RemoteHost>pc15002</RemoteHost>

            <Port>9997</Port>

            <layout class=”ch.qos.logback.classic.PatternLayout”>

            <pattern>%d{HH:mm:ss.SSS} %-5level [%thread] %logger{36} – %msg%n</pattern>

            </layout>

        </appender>

    • Add appender-ref to logger ESB and root as below

  1. For existing appnodes,
    1. we have to replace the existing logback.xml with modified logback.xml in step above (under D:\tibco\bw\6.4\config)
    2. Delete or rename the config folder of appnode
    3. Restart the appnode

ApplicationInsights-Appender for TIBCO BW6 logback

ApplicationInsights appender can be added to BW6 logback.xml by following the steps below.

  1. Add following jars and dummy ApplicationInsights.xml to D:\tibco\bw\6.4\system\shared\com.tibco.tpcl.logback_1.1.0.001

    applicationinsights-core-2.0.0.jar

    applicationinsights-logging-logback-2.3.1.jar

    applicationinsights-web-1.0.7.jar

    ApplicationInsights.xml content:


  2. Modify c:\tibco_642\bw\6.4\system\shared\com.tibco.tpcl.logback_1.1.0.001\META-INF\MANIFEST.MF by applicationinsights-core-2.0.0.jarapplicationinsights-logging-logback-2.3.1.jar,applicationinsights-web-1.0.7.jar to “Bundle-ClassPath”

  • Modify logback.xml under D:\tibco\bw\6.4\config
    • Add appender for applicationinsights, we must change the instrumentationKey based on the ENV

        your key

    • Add appender-ref to logger ESB and root as below

  1. For existing appnodes,
    1. we have to replace the existing logback.xml with modified logback.xml in step above(under D:\tibco\bw\6.4\config)
    2. Delete or rename the config folder of appnode
    3. Restart the appnode
      ApplicationInsights Appender
      Should we change existing applications? No
      Should we change existing BW installation? Yes
      Should we modify existing logback.xml? Yes
      Do we have parsed output in Azure portal? Yes
      What happens when Azure or network is down? We lose the logs
      Is thread blocked No


TIBCO BW6 – Elasticstack


We can integrate elasticstack with TIBCO BW6 logs in 2 ways.

  1. Using logstash appender for TIBCO BW6 logback
  2. Using filebeat to read existing logfiles

Logstach-Appender for TIBCO BW6 logback

Logstash appender can be added to BW6 logback.xml by following the steps below.

  1. Add following jars to D:\tibco\bw\6.4\system\shared\com.tibco.tpcl.logback_1.1.0.001

    logstash-logback-encoder-5.0.jar

    jackson-annotations-2.9.0.jar

    jackson-core-2.9.4.jar

    jackson-databind-2.9.4.jar

  1. Modify c:\tibco_642\bw\6.4\system\shared\com.tibco.tpcl.logback_1.1.0.001\META-INF\MANIFEST.MF by adding ,logstash-logback-encoder-5.0.jar,jackson-databind-2.9.4.jar,jackson-core-2.9.4.jar,jackson-annotations-2.9.0.jar to “Bundle-ClassPath”

  • Modify logback.xml under D:\tibco\bw\6.4\config
    • Add appender for Elasticsearch, we must change the destination based on the ENV

    <!– *=============================================================* –>

    <!– *  APPENDER: Elasticsearch                                   * –>

    <!– *=============================================================* –>

    <appender name=”LOGSTASH” class=”net.logstash.logback.appender.LogstashTcpSocketAppender”>

    <destination>Host:port</destination>

    <encoder class=”net.logstash.logback.encoder.LoggingEventCompositeJsonEncoder”>

    <providers>

    <mdc/> <!– MDC variables on the Thread will be written as JSON fields–>

    <context/> <!–Outputs entries from logback’s context –>

    <version/> <!– Logstash json format version, the @version field in the output–>

    <logLevel/>

    <loggerName/>


    <pattern>

    <pattern> <!– we can add some custom fields to be sent with all the log entries. –>


    </pattern>

    </pattern>


    <threadName/>

    <message/>


    <logstashMarkers/> <!– Useful so we can add extra information for specific log lines as Markers–>

    <arguments/> <!–or through StructuredArguments–>


    <stackTrace/>

    </providers>

    </encoder>

    </appender>

    • Add appender-ref to logger ESB and root as below

  1. For existing appnodes,
    1. we have to replace the existing logback.xml with modified logback.xml in step above (under D:\tibco\bw\6.4\config)
    2. Delete or rename the config folder of appnode
    3. Restart the appnode

Filebeat for existing ESB logs

We can also install ELK-filebeat to read the existing ESB logs and send them to ELK-elasticsearch via ELK-Filebeat.

Logstash Appender vs Filebeat

Logstash Appender Filebeat
Should we change existing applications? No No
Should we change existing BW installation? Yes No
Should we modify existing logback.xml? Yes No
Do we have same parsed output in Kibana? Yes Yes
What happens when logstash is down? We lose the logs after specified amount time or retries Logs are written to file and same will be exported to elasticsearch as soon logstach is back.
Is thread blocked No No

Doubts

Notifications based on some filters? Not tested yet, we need to install machine learning


FlowLimit and MaxSessions

FlowLimit

FlowLimit value will limit the number of process starter creation no matter what is configured in the sessions of JMS Receiver

MaxSessions

A Session object is a single-threaded context for producing and consuming messages.

TestCase Number FlowLimit MaxSessions Result
1 5 1 Only one process instance will be crated
2 5 3 3 instances will be created and processed parallel.
3 5 6 5 instances will be created and processed parallel.

The best practice or suggestion is below:

  1. Create Max Session as per your requirement.
  2. Set the FlowLimit value greater than the Max Session

Setting flowlimit for a bwapplication in debugging mode.

-Dbw.application.job.flowlimit.<application name>.<application version> =<flowlimit value>

Eg: -Dbw.application.job.flowlimit.EMS.ACKMode.Tester.application.1.0=5

Setting max sessions for JMS Receive Message activity

Enable JMX on the AppNode

This post would explain what are the properties that need to be added to BW appnode to enable JMX.

From TIB_BW_performance_benchmarking_tuning https://docs.tibco.com/pub/activematrix_businessworks/6.3.4/doc/html/GUID-BAC813F8-5DDC-4043-86D6-2F5D6C286B02.html – we need to enable JMX on the appnode to use JVisualVM to monitor appnode.

Below are the properties that need to be added BW appnode.tra(%TIBCO_HOME%\bw\6.3\domains\%domain%\appnodes\%AppSpace%\%AppNode%\bin\ bwappnode-%AppNode%.tra) to enable JMX.

#Enabling JMX on AppNode

Jmx.Enabled=true

java.property.com.sun.management.jmxremote=true

java.property.com.sun.management.jmxremote.port=8999

java.property.com.sun.management.jmxremote.authenticate=false

java.property.com.sun.management.jmxremote.ssl=false

Below is the screenshot of appnode.tra

Restart the appnode after adding above properties.

Now we can use JVisualVM to monitor appnode as described in Monitoring Threads and Taking Thread Dump Using JVisualVM(https://docs.tibco.com/pub/activematrix_businessworks/6.3.4/doc/html/GUID-BAC813F8-5DDC-4043-86D6-2F5D6C286B02.html)

Thank you!

Registering BW AppNode as Windows NT Service

  1. Navigate to appnode bin directory e.g. D:\tibco\bw\6.3\domains\ERP\appnodes\ERPAppSpace\ERPAppNode\bin
  2. Edit the appnode TRA file e.g. bwappnode-ERPAppNode.tra & add the following lines

                       +++++++++++++++++++++++++++++++++++++++++++++++++++++++++++++++++++++++++++++++++++++++++++++

ntservice.name=ERP_AppNode_SVESBD20

ntservice.binary.path.absolute=D:/tibco/bw/6.3/domains/ERP/appnodes/ERPAppSpace/ERPAppNode/bin/bwappnode-ERPAppNode.exe

application.args=-config D:/tibco/bw/6.3/domains/ERP/appnodes/ERPAppSpace/ERPAppNode/config.ini start

++++++++++++++++++++++++++++++++++++++++++++++++++++++++++++++++++++++++++++++++++++++++++++

3. Open a command prompt , navigate to D:\tibco\bw\6.3\domains\ERP\appnodes\ERPAppSpace\ERPAppNode\bin & execute the following command

bwappnode-ERPAppNode.exe –install

4. The appnode will be registered as a Windows service under”ERP_AppNode_SVESBD20″ name. Modify the service property to log on as the desired user having access to SQLserver DB/File System(in this case)

5. Start the service; confirm that the appnode has started in TEA.

Importing HTTPS-WSDL to Service Descriptors in BW6 application

Process is explained using https://%server%/XRMServices/2011/Organization.svc?singleWsdl

  1. Get the certificates form URL – follow the steps below.

  1. Import the certificates to ‘cacerts’ under %tibco_home%\tibcojre64\1.8.0\lib\security by executing keytool –importcert from %tibco_home%\tibcojre64\1.8.0\bin

++++++++++++++++++++++++++++++++++++++++++++++++++++++++++++++++++++++++++++++++++++++++++++++++++++++++++++++++++++++++++++++++++++++++

keytool -importcert -alias CRMDynamics -file %location of certificates% -keystore c:\tibco_bw6\tibcojre64\1.8.0\lib\security\cacerts

keystore password: changeit

++++++++++++++++++++++++++++++++++++++++++++++++++++++++++++++++++++++++++++++++++++++++++++++++++++++++++++++++++++++++++++++++++++++++

  1. In TIBCO Business Studio

  1. The WSDL will be added to Service Descriptors folder

IBM DB2 JDBC Connection Resource Configuration

Below is the procedure to connect DB2 version – DB2 for i V7R2 TR4 using drivers – db2jcc4.jar, db2jcc_license_cisuz.jar.

We had following exception when we click on ‘Test Connection’ after configuring JDBC Connection resource as below.

The above exception would be solved by adding db2jcc4.jar, db2jcc_license_cisuz.jar at %BW_HOME%\6.3\config\design\thirdparty\

When we try to run/debug the application. We will be faced with following exception

+++++++++++++++++++++++++++++++++++++++++++++++++++++++++++++++++++++++++++++++++++++++++++++++++++++++++++++++++++++++++++++++++++++++++++++++++++++++++++++++++++++++++++++++++++++

09:08:52.456 ERROR [CM Configuration Updater (Update: pid=bw.resource.jdbc.f47acaa5-7144-47c8-96f7-29857b5ab64b)] c.t.b.s.r.d.ReferenceDependency – TIBCO-BW-SR-FRWK-503000: Unable to start SharedResource [test.db2.JDBCConnectionResource1] from Module [test.db2:1.0.0.qualifier], DeploymentUnit [test.db2.application:1.0]. : TIBCO-BW-SR-JDBC-500003: The database driver [com.ibm.db2.jcc.DB2Driver] is not found. Ensure that DataSourceFactory bundle providing this driver is available in the environment.

09:08:52.902 ERROR [Job_Executor0] com.tibco.thor.frwk.Application – TIBCO-THOR-FRWK-600026: Failed to start BW Application [test.db2.application:1.0]. Reason: TIBCO-BW-FRWK-600063: Failed to start BW Process [test.db2.Process] of BW Module [test.db2].

java.lang.RuntimeException: TIBCO-BW-FRWK-600064: Failed to create Shared Resource [test.db2.JDBCConnectionResource1]. For the cause look for log message with prefix “TIBCO-BW-SR-FRWK” in this log file.

09:08:52.920 INFO [Job_Executor0] com.tibco.thor.frwk.Application – TIBCO-THOR-FRWK-300008: Stopped BW Application [test.db2.application:1.0]

+++++++++++++++++++++++++++++++++++++++++++++++++++++++++++++++++++++++++++++++++++++++++++++++++++++++++++++++++++++++++++++++++++++++++++++++++++++++++++++++++++++++++++++++++++++

The above exception could be solved making the driver available for run time.

%BW_HOME%\6.3\config\drivers\shells\jdbc.db2.runtime\runtime\plugins\com.tibco.bw.jdbc.datasourcefactory.db2\lib

c:\tibco_bw633_new\bw\6.3\bin\bwinstall.exe db2-driver

Restart the Business Studio, our application should be able communicate with DB2.

Installing Maven and Maven Plug-in for TIBCO BW

  1. Download apache-maven-3.3.9-bin.zip from https://maven.apache.org/download.cgi
  2. Extract apache-maven-3.3.9-bin.zip and copy it to your installation directory(eg C:\ as shown below), this all that has to be done from installation of Maven.

  3. Add a new system ‘M2_HOME’ = C:\apache-maven-3.3.9

  4. Add C:\apache-maven-3.3.9\bin to path system variable.

    Above are the prerequisites for installing BW6 Maven plugin.

  5. Verify Maven installation as shown below from command prompt.

  6. Unzip TIB_BW_Maven_Plugin_1.1.0.zip from ….\bw6-plugin-maven-master\Installer
  7. Run C:\Users\cch\Downloads\bw6-plugin-maven-master\Installer\TIB_BW_Maven_Plugin_1.1.0\install.bat from command line, provide tibco BW6 home where you would like to install the plugin(eg: c:\tibco_bw6)

    After ‘BUILD SUCCESSFUL’ message at the end, maven plugin would have been installed successfully in provided tibco home.

  8. Verify that maven plugin has been installed successfully by opening ‘studio for designers’ and right click on any application. You should see ‘Generate POM for Application’

  9. Type the goal as “package” to create an EAR file.
  10. Type the goal as “install” to create an EAR file

TIBCO AMXBPM LDAP configuration exception

Problem:
========
I have installed TIB_amx-bpm_3.1.0_win_x86_64, everything was fine, I was able to login to administrator, openspace.
After restarting the server. I was not able to login to openspace with following error in BPMNode.log

16 Sep 2015 06:23:38,585 [httpConnector_30] [ERROR] [] com.tibco.amx.governance.pa.action.authentication.AuthenticationAbstractAction – Failed to authenticate username and password.
com.tibco.governance.pa.action.security.SecurityException: Failed to authenticate username and password.
at com.tibco.governance.pa.action.authentication.celm.AuthenticationByCelmConnection.authenticatePublicCredentials(AuthenticationByCelmConnection.java:143)
at com.tibco.governance.pa.action.authentication.trinity.AuthenticationByLdapModule.authenticateByLdap(AuthenticationByLdapModule.java:60)
at com.tibco.governance.pa.action.authentication.trinity.AuthenticationByCelmModule.authenticateByCelm(AuthenticationByCelmModule.java:167)
at com.tibco.governance.pa.action.authentication.trinity.TrinityAuthenticationByCelm.authenticateByAsp(TrinityAuthenticationByCelm.java:51)
at com.tibco.governance.pa.action.authentication.trinity.TrinityAuthenticationByJaas.authenticate(TrinityAuthenticationByJaas.java:60)
.
.
.
.
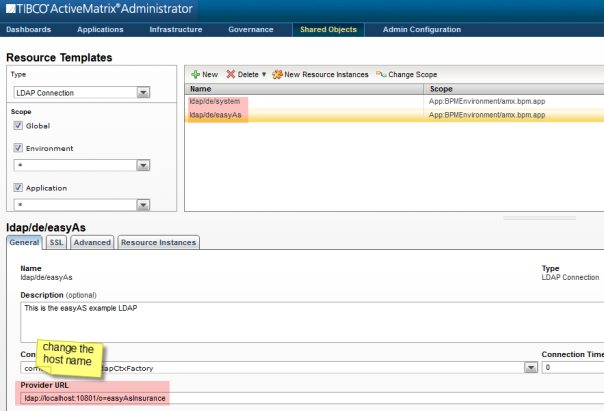
Caused by: com.tibco.trinity.runtime.core.provider.authn.LoginConnectionException: javax.naming.CommunicationException: 192.168.1.12:10801 [Root exception is java.net.ConnectException: Connection timed out: connect]
at com.tibco.trinity.runtime.core.provider.authn.ldap.LdapAuthNLoginModule.doLogin(LdapAuthNLoginModule.java:371)

Resolution:
===========
LDAP connection resource template should be updated. This was configured with dynamic ip address.LDAP_Config_Change